Saturday, November 15, 2008

Handmade Christmas Cards for order


Wreath Merry Christmas Card: (5-1/2x4-1/4) can be made to fit a 3X5 photo
Merry Christmas Floating Card: (5-1/2x4-1/4)
Be Merry Simple Snowflake Card: (5-1/2x4-1/4) can be make to fit a 3x5 photo


9 x 4 Photo Card (fits a 3x5photo)

Inside of card says "May your Holidays sparkle, shimmer and shine with joy!"


Last day to order for early December completion is Nov. 22nd. Orders later than Nov. 22nd will be delivered mid December. All cards come with Bright White Envelopes. You may order single cards for $1 each or increments of 12 for $10 plus shipping and handling.

Wednesday, November 12, 2008

October 2008

Floating Christmas Card

Used: Acetate (Transparency paper)
Whisper White Craft ink
Iridescent Ice embossing powder
VersaMark
Basic Black ink

Bashful Blue card stock
Riding Hood Red card stock
Riding Hood Red ta
Publish Post
ffeta ribbon (pull one strand from the to gather)
Whisper White card stock
Glue dots


Live with Passion Watercolor Card


Used: Inspired by Nature Stamp Set
Watercolor Wander Crayons
Water spay mister
Close to Cocoa card stock
Old Olive card stock
Very Vanilla card stock
Choc. Chip grosgrain ribbon
Choc. Chip ink


Flight of the Butterfly Spiral Card

Jazz up the inside of your card by adding a spiral pop. To make the spiral, take the blue circles punched out by the 1-3/8 circle punch out of your kit. Cut from the outside of the circle following the shape of the circle until you have a spring. Attach to card with strong adhesive (I used Crystal Effects). The best way to attach the spiral is glue one end at a time. When you are gluing the 2nd, add glue to the tip of the spiral tail and close the card for a couple seconds. Then open it and make sure that nothing but the spiral tail has adhered to the card. Attach your butterflies to the spiral. To attach your butterflies on the front of the card and give them fluttering effect, just put glue on the middle and bend up their wings a little.

Sunday, October 5, 2008

September 2008

Cook Book Mark
Dimensions:
9x2 of Riding Hood Red card stock (folded in half)
5/8x 1-3/4 Bella Rose Designer Paper
1-3/4-Whisper White stamped with recipe card
1-1/4 circle punch-Whisper White
1-3/8 cirlce punch-Riding Hood Red
Scallop Circle punch-Kiwi Kiss
Stamp set-From the Kitchen Of
Magnets for the inside bottom of bookmark


Witches Broom Treat Bag
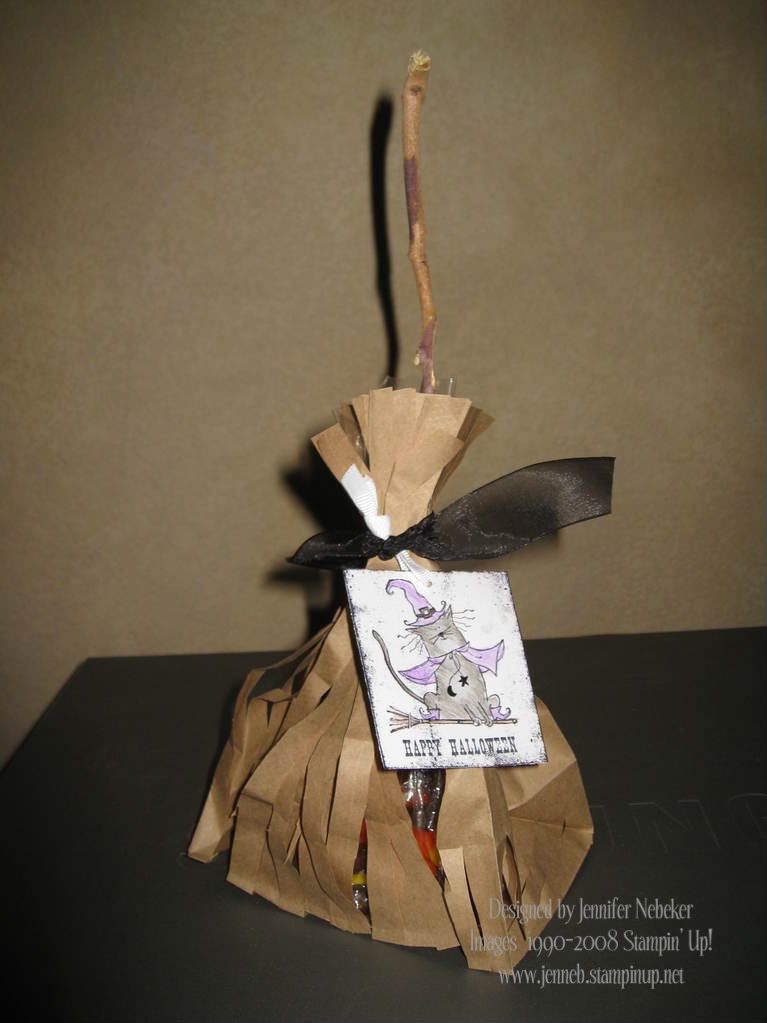
I copied this from the SU Catalog. Thought it was so cute. I forgot to give some of you Cello bags with your kit...sorry. I also did not include the broom handle (stick). I thought most of you could find your own stick and have better luck finding a good one than I did here in the desert. I used: Whisper White Card Stock, Black Ink, Haunting Halloween Set, All Holiday Set and colored with Watercolor Pencils & blender pen.
Instructions: Trim down your brown paper bag from the top, so that it is proportion to your treat you are going to give. I cut about 1/3 off the top. Then cut 1/2" strips from the top of the bag down to the bottom. Stop cutting before you cut all the way through as to leave the bag/strips attached to the bottom. Insert your treats in the cello bag and stick/handle and gather up the bag strips and tie the tag. I gave you hemp to tie the tag to the bag. I used the black ribbon and white ribbon in my sample, but decided that the hemp would give it more natural feel. Have fun!


Turkey Punch Card

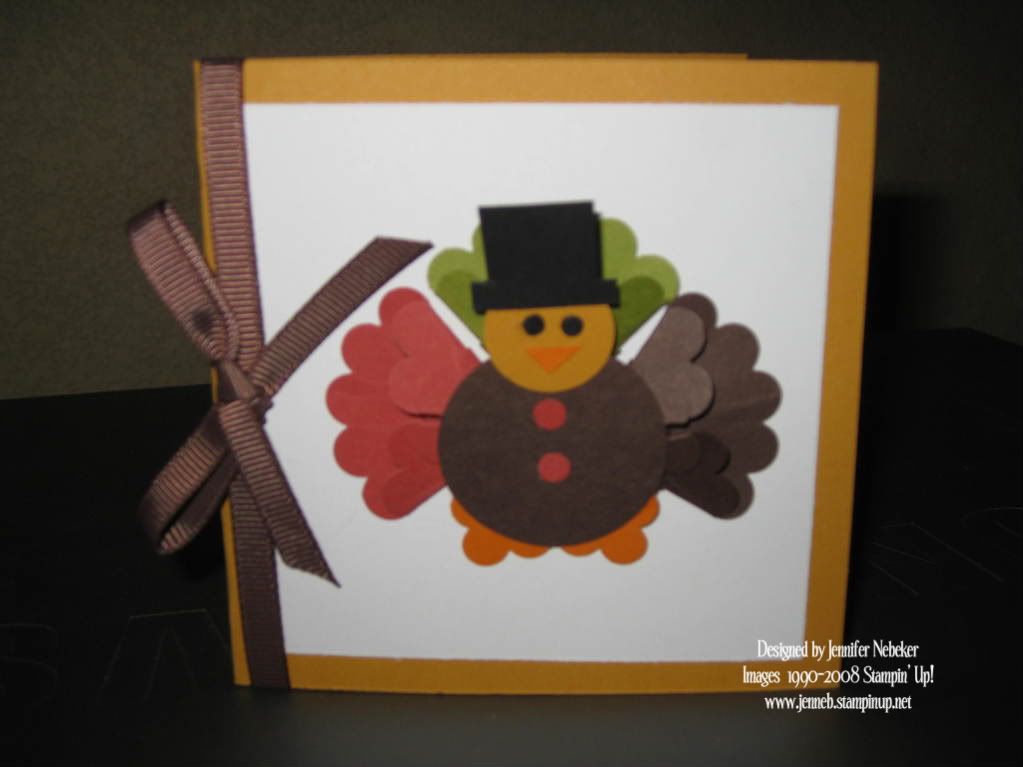
4X4 card using: More Mustard, Choc. Chip, Old Olive, Ruby Red, Pumpkin Pie, Black, Whisper White card stock & Choc. Chip Ribbon.

Scallop circle punch for the feathers, 3/4 circle punch for the head, 1-3/8 circle punch for the body, Square Scallop punch for the feet (just used the corners of the square scallop or you can use a flower from the Boho blossom punch or Trio Flower punch), Square punch for the hat and I used the circle punches on the crop-a-dile for the buttons and the eyes. I used small glue dots to adhere the feathers to the body, but you can also use Sticky Strip or any other strong adhesive.

Sunday, September 14, 2008

August 2008


Halloween Progressive Scrapbook Page

I pick up this cool way of doing scrapbook pages that will help out all of those that have different sizes of scrapbooks. Instead of me making 2 to 3 different sizes of pages, I make a 6x6 page and show you how to add it to and make an 8-1/2 x 11 or 12x12 pages. This gives you the opportunity to use your stamps and customize it for you. Let me know what you think!


Water Bottle Drink Holder

This is an easy fix for a quick gift. I gave them to my kids' teachers on the 3 week of school. You have everything you need in your kit (except a bottle of water). All you need to do is color in the pickup and flowers and assemble. I used the Water Color Wander Crayons to color in the pickup. The dimensions I used was 8x2-1/2 and punched the circles with the 1-1/4 circle punch. The pickup is from the Loads of Love set, Designer paper is Maine Blueberry, and card stock and ink is Not Quite Navy. Cheers!


Frankenstein Treat Bag

Fun way to give out Halloween treat to those special trick-r-treaters.
Uses circle punches for the eyes and the nose and eye lids are circles that are cut in half. Look close at the black cardstock in your kit. I traced the hair for you. All you have to do is cut it out and assemble.

Tuesday, July 29, 2008

I'm off to convention in Salt Lake City!! I thought I share my swaps that I'm taking with me. Here they are are. My favorite is the cupcake cards as they are my very own idea, no casing other projects on that one! Look forward to lots of fun projects in the up coming months.


July 2008

Zoofari Birthday Card

6x5-1/2 Real red card stock, scored at 3"
4x1-1/2 Old olive card stock, popped up
Zoofari stamp set
All Holiday stamp set
Scallop punch
1-3/8 circle punch
Black ink
Blender pen
Red gingham ribbon


Ice Cream Bar Card

5-1/2 x 3-3/4 Choc. Chip Card Stock
Old Olive Card Stock
Whisper White Card Stock
Scallop Punch (for Strawberry & for teeth/bite)
Corner rounder punch
Tart and Tangy Stamp Set
Pop cycle stick
Sticky Strip to attach pop cycle stick
Old Olive Grosgrain ribbon (holds card closed)
Real Red Marker
Old Olive Marker
Choc. Chip Marker
Crystal Effect (to make the strawberry look like dipped choc.)


Ice Cream Cone Card

Very Vanillia Card Stock
Certainly Celery Card Stock
Creamy Carmel Card Stock (cut in cone and scored)
Whisper White Card Stock (5-1/2 x 6)
Chalk/Pastels
Choc. chip grosgrain ribbon
Certainly celery grosgrain ribbon (frayed)
Short n Sweet stamp set
Choc. chip ink

Tips: Ice cream scopes were make by punching a scallop then punching the top of scallop of with circle punch. Then I shaded the edges with chalk/pastels. To fray the ribbon, you need to find the string on the side and pull it out...I've started the ribbon in the kit for you.

Monday, July 21, 2008

June 2008

Glitter Window

Very easy and fun card. I used the Scallops punch to punch the scallops then I used the Snow Blossom punch to punch out the middle of the scallop. Then use packing tape to cover the snow blossom punch out. Apply Dazzling Diamond Glitter and embellish. It's that easy!

Thursday, June 5, 2008

May Projects 2008

Enjoy Life Scrapbook Page 8.5x11
Used the "Summer Days" Simply Scrappin' Kit, Stitched Exotic stamp set and the Enjoy Every Moment stamp set. Enjoy your page!


Fresh Cuts Card (June Promotion)

This simple card was made from a pre-cut card that is my June Promotion. Click the link to see all the details. Making cards has never been easier.
Kit assembly instructions:
  • punch out the flower pedals
  • adhere the ribbon as the stem and leaf
  • adhere button
  • rub the rub-on (from the "A Perfect Day" rub-on kit in the mini catalog) on the SU Designer pattern paper. You'll need to make sure you center and have the rub-on flower positioned correctly so it lines up with the flower cut out.
  • adhere the pattern paper behind the front of the card so the paper shows through the cut out (I included pieces of rubber/foam. Just peal off the rubber backing and you've got yourself a foam dimentional. I sometime use a little glue on the rubber side as some of the adhesive peals off along with the rubber).


Orange Crystal Effects Card

Kit instructions:
  1. Glue patter paper (from Bali Breeze Designer Paper) and the orange card stock in place on card base.
  2. Tape Pumpkin Pie striped ribbon on Olive Green card stock.
  3. Glue green card stock w/ ribbon on the card.
  4. Glue orange that was stamped from the "Tart N Tangy" set in pumpkin pie ink and coated in crystal effects on the "Taken With Teal" scallop.
  5. Adhere the leaves by folding the green card stock strip that was cut at points at the end and gluing. (an easy way to make a leaf, is use the Word Window punch and cut your ends)
  6. Adhere scallop on the card with the 3-d foam provided.

Wednesday, April 30, 2008

April 2008


Wild Wasabi Card

Instructions:
  • Distress the edge of the flap of card by scrapping it with the sharp edge of scissors. Tie ribbon around it, fold it up and secure with adhesive. (If glue stick doesn't hold, I suggest using Sticky Strip).
  • Cut around the 2 flowers that have been pre-stamped and place brad in the center. Adhere with glue dot included in your kit.
  • Optional: you my stamp any greeting you wish. I used 'Mom' in this sample to use as a Mother's Day card.
(Products used: Wild Wasabi Textured card stock, Rose red card stock, Always Artichoke ink, Rhinestone brads, VersaMark Pad (flower), 'Stitched Exotics' stamp set & 'It's Beautiful' Wheel.


Scratch-n-Sniff Mini Card

Instructions: Assembly is pretty self explanatory. I made the scratch-n-sniff area by mixing sugar-free drink mix and crystal clear embossing powder together and heat embossing over the desired image. I used my VersaMarker to highlight the area I wanted the embossing mixture to stick before heating. To make the scallops on the pattern paper, I used my corner punch but took the guard off the get the 1/2 circle effect. Optional: for this sample I did some dry embossing to add some texture and I added white dots on the scallop circle with my White uni-ball Signo gel pen. (Products used: 'Tart & Tangy' stamp set, 6x6 Hostess 'Prints Designer Paper pack' & red gingham ribbon, whisper white card stock, real red card stock)


Bagalope

Instructions:

  • Score 3 sides of a 4x6 envelope (any size would work, just make sure to score the all 3 sides the same) @ 3/4 inch.
  • Seal envelope and cut the top (no scored edge). You may use shaped scissors or use the corner punch with the guard taken off as I did.
  • Stamp on envelope. I used the 'It's Beautiful' wheel in Choc. chip ink.
  • Fold all score lines back and forth a couple times to make it easier to assemble.
  • Put hand in the opening you made when you cut off the top and flatten the sides and bottom. Tape the 2 triangle flaps on the bottom of the envelope so that it's square and will stand up.
  • Embellish bag as desired. The embellishment that I made is a piece of close to cocoa card stock that I crimped. On top of the crimped card stock is some twill ribbon that I stamped on in Real red ink with a stamp from the 'Warm Words' set and set red eyelets with the crop-a-dile (believe it or not, the crop-a-dile punched through 2 layers of the twill ribbon and the card stock!)
  • Fill with red crimped filler provided in kit and what ever you want to give away.

Monday, March 17, 2008

March '08 Stamp Club


Chalkboard Technique
Card Instructions:

~Use Craft White Ink to stamp flower from "Stiched Exotics" stamp set
~Chalk the flower with SU Pastels.
~Embellish with small flower punched out with small circle punch and adhere with mini pop dot.
~White ribbon knot-adhere with mini pop dot.
~Punch out bottom corners with circle or slit punch.
~Stamp background image with versa mark.
~Set three eyelets using the Crop-a-dile.


St. Patricks Day CD Cover

Instructions:
(coming soon)

Wednesday, March 5, 2008

February '08 Stamp Club

Matchbox Gift Card Holder
Kit contents:

So Saffron pre-scored card and slit punched Certainly Celery Pattern Paper
So Saffron Pattern Paper
Scallop punched in Choc. Chip
Choc. Chip Grosgrain Ribbon
Happy Birthday stamped on Whisper White (SAB set So Many Scallops) with Certainly Celery Ink

Hints for assembling:
~make sure all ribbon is threaded through all layers of card stock
~use the thin foam dot for adhere the white circle to brown scallop (peal the rubber off and the paper off)
~use the larger foam dot to adhere the brown scallop to yellow pattern paper.
~Lastly insert gift card on the inside.


Time Well Spent
Instructions

1. Stamp greeting (from Time Well Spent stamp set) in Choc. Chip ink on Close to Cocoa card. (4-1/4" x 11") Highlight “Friends” using Versamarker.
2. Tie Wild Wasabi Stitched ribbon (15") around card.
3. Stamp large flower in Choc. Chip ink on Ruby Red (3" x 3") and stamp the small flower on So Saffron card stock. Cut out Ruby Red flower, and highlight edges using VersaMarker. Punch 1/8" holes around center of Ruby Red flower. Use the leftover circles from punching the Ruby Red flower and adhere to the 2 flowers in the greeting.
4. Punch scalloped circle from So Saffron card stock (3" x 3") using Scallop Circle punch, and adhere behind Ruby Red flower.
5. Punch out the small So Saffron flower using 3/4" Circle punch, and highlight edges of smaller flower using VersaMarker. Attach small circle of Wild Wasabi card stock to center of So Saffron flower, and adhere to Ruby Red Flower.
6. Attach Ruby Red flower to card using Stampin Dimensionals.